
Tutorial: How to Make Yoga Shorts from an Infinity Dress
I'm here to also talk about yoga workout clothes. More specifically, making them.
One of the things I used to groan about exercise was that I didn't have enough exercise clothes to sweat into.
 When I sweat, I sweat buckets. Seriously. The last time I did yoga, and went up to take a bath, James was aghast and exclaimed, "Honey! Did you do manual labor or something?!" (Also, iron-clad rules for fitness, ladies and gents: Drink. Water. Keep drinking. One of the best and simplest rules ever.) Now, lovely as a good, hard-earned sweat can be, running out of sweat-able clothes isn't. So, In the DIY-ness you know me best, I converted an ill-fitting stretch jersey A-line infinity dress I picked up from a bazaar into yoga shorts.
Some of your readers may remember this dress. I wore it once to a company christmas party, and soon relegated it to office-wear and family-lunch-wear. After some time, I noticed the skirt fit was awkward, the ties too short for me to get creative with, and it was just overall ill-fitting. So, with such nice-moving fabric, what now?
Enter yoga shorts. If there are yoga pants, why not shorts?

Le dress in question.
Hey, shorts, I think I know you from somewhere.
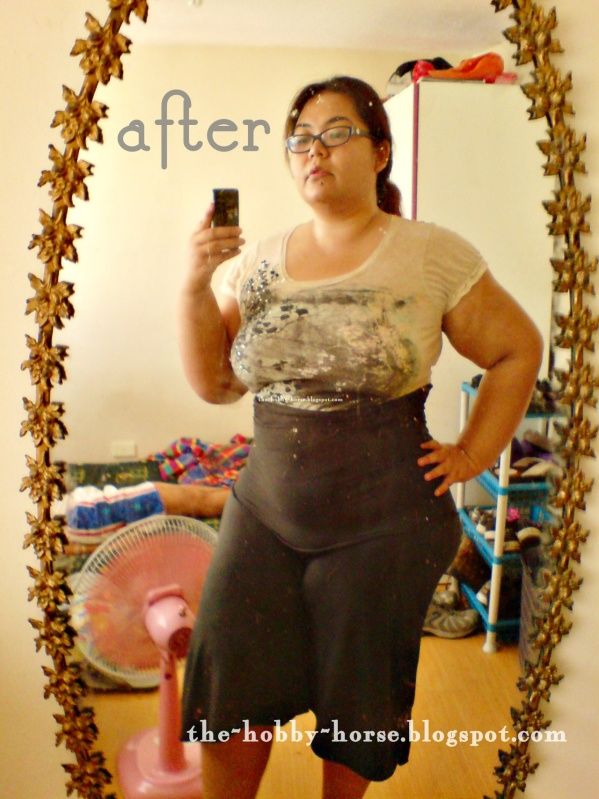
Lo, a sweaty, worked-out mess of a me, and a sleeping James.
So, how did this happen?
- I first cut away the straps sewn onto the main skirt.
- I turned the skirt right-side in, making sure the factory serging is on the outside.
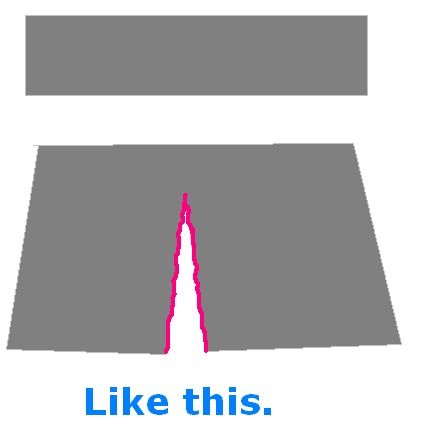
- I laid the skirt out on a flat surface, front up, and folded it in half lengthwise.
- I gauged where I wanted the seat to be(from the waistline heading down to any point on the fold), and started cutting along the fold to that point.
- Note: if you feel you may have cut your seat too close to the waistband edge (like I did), don't panic. We can remedy that later with the other bits of the dress.
- With my sewing machine set to zigzag stitch, I sewed up the cut edges on the fold. I checked my stitches, stretching the fabric to make sure I didn't miss any edges.

- I next took the two cut-off straps, lined them up nicely, and sewed them up on three sides, leaving one short edge open.

- After that, I turned the tube inside out to hide the sewn edges and give the tube a clean look.
- I took my tube, and measured it against my body by wrapping it around my belly. (I say belly, -- or core, for you fitness-inclined readers -- because this band will most likely cover you from lower hip to waist to a bit beneath your chest, like in my After picture up there). I checked how much of the band I would need length-wise, with just a bit of comfortable stretch to it. I marked where I would sew and cut off the excess with tailor's chalk. (A crayon hi-lighter is also ok.)
- I decided which side of the tube was going to be the right side (the side facing everyone else), and the wrong side (the side facing my belly). I folded the tube in half crosswise, right side in, and sewed the marked ends together to form a ring. I snipped off the excess fabric, and trimmed it just enough to keep it neat, and just the right distance to not fray the stitched edge.
- Now... I have a nice, wide, stretchy ring, and a nice, wide, stretchy, flip-floppy pair of shorts. I laid both of them out on a flat surface -- ring's seams and shorts' seams center and aright -- and I made sure that both of them were right-sides in. (Not really, but that's where I made a mistake. Now, you guys make sure they're right sides in, ok?)
- Note: some of you readers out there might have short-waistlines wider than your rings. That's ok, because we're going to do something about it.If your rings are wider than your short-waistlines, that's also ok. We're working with stretch jersey fabric with no edging, so yay freedom of stretchiness! Just make sure your ring is slightly tighter on your belly, but still comfortable enough for you to move in. )
- Next, I folded both ring and shorts in half cross-wise.
- I took out my pins, and pinned all the folded edges on the ring.

- I did the same thing on the shorts' waistline.
- I next aligned the pins on the ring with the pins on the shorts.

- Using the pins as a guide, I sewed the ring and the shorts' waistline together. Ring, meet shorts.

- I paused, and kinda went asasdfljkhlaskgklj in my head. Almost done!
- I turned the shorts inside out, and shook them out.
- I wore the shorts, and I scrutinized them in the mirror.
- I next merrily went out and yoga'd the hell out of them.
Yay!
For more variations, may I suggest these wholesome and finely-crafted links:
- To make yoga pants with stretchy fabric and an old pair of leggings, the ever-awesome Corinne Leigh shows you how.
- To make yoga pants out of over-sized t-shirts, look here and here and here and here.
I'd like to leave you with an awesome video of one of the many benefits of Yoga.
Hope you liked the tutorial! Have a great day!


0 Comments:
Care to leave a comment? I'd love to hear what's on your mind. :)